Although I tweeted about my amazing experience at this year's Simcoe County District School Board's PUSH Conference, I never blogged about it or shared my presentation on my blog. The PUSH Conference occurred on March 5th, 2016 and was such an exciting event. Educators from the Simcoe Board unite to discuss how to integrate technology and new ideas into classrooms; so many bright and outside-of-the-box thinkers in one place was a unique experience for me and I learned so much as a result. I am very thankful that SCDSB has the PUSH Conference on a yearly basis, that educators are so open-minded and willing to try new things in the classroom, and that educators are willing to share their bright ideas with others. Speaking of which, I have included my presentation 'Making Media Matter' which I presented with my partner (Alanna Uyl) at the SCDSB PUSH Conference in this blog post. Our presentation discusses why we should include media in the classroom and what the pros and cons are to this decision. Our presentation had participants interacting using technology as we went along. Overall, we shared our experiences with technology as teacher candidates and how we have integrated technology in the classroom in our placements, in our volunteer work, in our university class work, and just in our own personal lives as well. The material from this presentation was mostly collected and researched throughout our Honours Media course at Lakehead University Orillia (Media and Digital Literacy: MDL 4000). We had many opportunities to take what we learned from this course and use it with students. This can be seen with in our examples of students playing with green screen, google drawings, etc. The opportunity of testing technology integration and presenting our findings at the PUSH Conference is one that I will never forget. Not only did we present our own findings but we were able to hear other presenters talk about what they believe in and have found useful in the classroom. From Minecraft to Twitter to Seesaw to Breakout Education, my mind was blown. Can't wait to implement these ideas in future classrooms and blog about them!
Making Media Matter:
Saturday 30 April 2016
Tuesday 2 February 2016
Fractions
Fractions can be hard for students to understand because they can represent many different things and can be represented in many different ways. Students bring prior personal knowledge to school and it is the teacher’s responsibility to build off of this knowledge. Teachers should understand their students’ prior knowledge in order to use and apply teaching methods that will be most fitting for their class (Flores & Klein, 2005). It is important to have students learn through context and content rather than memorization (Sharp et al. 2002). This is why we should allow them to learn through picture and concrete materials before introducing symbols (Ex. 3/4) (Sharp et al. 2002). The materials that we use with students should have the ability to be divided and subdivided unless we are specifically using them with set models (Flores & Klein, 2005). For example, brownies are a better choice than marbles because you can’t divide a marble (Flores & Klein, 2005). It is also important to show or use pre-cut fraction pieces for accuracy (Flores & Klein, 2005). Teachers will need to use different materials and presentations to see what works with their class (Flores & Klein, 2005); these ideas can be derived from students, teachers, research, own experiences, etc. I have some ideas for materials that could be used in the classroom in order to learn different types of fractions.
Area models involve sharing something so we need to cut it into smaller pieces (Karp et al. 2015). The most frequently used model are circular ‘pie’ pieces (Karp et al. 2015); however this is not always the most helpful as children find it difficult to divide a circle evenly. We should use rectangles to divide evenly at the beginning until students become more familiar. Rectangles can be used in many ways. For example, you could divide a rectangle evenly by folding paper, dividing a candy bar or cake, using a geoboard and elastics, etc. There are even tools and apps that can be used to replace the geoboard. Here is an example of a student using a geoboard app to find the relationship between 1/2 and 3/8.
The student in the video used the Geoboard App to compare the two fractions. On this application, you can change the size of the board, add a number grid, draw, use the calculator, and even change the board from a rectangle to a circle. The circle geoboard application would be useful in the classroom because it already divides the circle into even pieces that the students can use to further divide if they wish. Once students understand how to evenly divide a circle, they can begin to use circular materials such as pie, pizza, cake, tortillas, fraction circles, spinners, etc. Another material that could be used is pattern blocks. The students could find what fraction the different shapes represent if, for example, the hexagon was a whole. You could start with the hexagon as the whole and as the students become more familiar, you can try this with the other shapes being wholes as well. Here is a video that explains this concept further:
This can be done through tools and applications as well such as The Math Learning Centre Pattern Shape App and The Math Playground Pattern Block App.
Linear models involve the length of the whole divided into equal lengths (Karp et al. 2015). A fraction is seen as being a specific distance from zero to the whole. There are many materials that are helpful for students to understand linear fractions; two of these include number lines and cuisenaire rods. Number lines have been recognized as an essential model when teaching fractions mostly because students can then understand that fractions are numbers and can see where they are placed in regard to the whole (Karp et al. 2015). Number lines can be made in many ways including folding paper, writing on paper, using a wall, using applications, etc. Here is an application that I found that would be useful to use in the classroom: The Math Learning Center Number Line App. With this application, you can have a number line with predetermined number ticks or you can custom make your own number line. You’re able to make the ticks on the number line narrower or wider, draw on the application, hide the numbers on the line and fill them in yourself or uncover them, make jumps on the number line, use the calculator, etc. Cuisenaire rods are another linear model that can be used; they are ten rods that are measured according to the smallest rod (Karp et al. 2015). Each rod is coloured so students can quickly identify which rod is which (Karp et al. 2015). Here is an introductory video for cuisenaire rods:
Cuisenaire rods can be used in many ways. One example of this is to not always have rod ten represent the whole. If you want your students to look at 1/4’s and 1/8’s then you could select rod 8 as the whole. You could also make a whole by attaching two rods. For example, you could attach rod ten with rod two to have your students looking at twelfths (Karp et al. 2015). There are online tools and applications that can be used to explore cuisinaire rods such as The Math Playground Math Bars and The Math Toy Box Number Blocks. Some other ways to represent this model include rulers, linking cube trains, and fraction bars or strips.
Lastly, there are set models which involve a set of objects that make up a whole (Karp et al. 2015). For example, a set of ten cars could make one whole; one of these cars would be 1/10. This model is especially difficult for students to understand as they tend to think that the one object is already the whole (Karp et al. 2015). Students who have difficulties with set models can use a piece of yarn or string to tie around the objects so they can see it as a whole (Karp et al. 2015). You could make set models out of anything that the class has an interest in such as dinosaurs, skittles, two-coloured counters, bingo chips, foam shapes, pattern blocks, themselves, etc. Set models can be easily made in the classroom; although there are online tools and applications as well. Here is one that I have discovered called the Toy Factory which allows students to make their own toys in the toy factory and then determine how many are red, how many are monkeys, etc. Although this model is more difficult for students, it is important for them to see fractions in all three models (area, linear, and set) (Karp et al. 2015). Some materials are able to be used for all three models. One of these materials is LEGO; here is a video that shows some ways LEGO can be used in math and with fractions. LEGO can be used as an area model by covering the area of a larger LEGO piece with smaller LEGO pieces. LEGO can also be used as a linear model by creating a line with the LEGO pieces and measuring. Lastly, LEGO can be used as a set model by using many LEGO pieces to make a whole. This is a new idea for me and I cannot wait to use LEGO in the classroom.
References
Flores, A., & Klein, E. (2005). From students’ problem-solving strategies to connections in fractions. Teaching children mathematics, 452-457. Retrieved January 19, 2016.
Karp, Bay-Williams & Van de Walle. (2015). Developing fraction concepts. In Elementary and middle school mathematics: Teaching developmentally (9th ed., pp. 284-309). Toronto, ON: Pearson Education Canada Inc.
Sharp, J., Garofalo, J., & Adams, B. (2002). Children’s development of meaningful fraction algorithms: A kid’s cookies and a puppy’s pills. Making sense of fractions, rations, and proportions, 18-28. Retrieved January 12, 2016.
Sunday 24 January 2016
Storybird

Storybird is a platform for individuals of all ages. This tool will bring out the writer, reader, and artist in everyone since there are multiple ways this tool can be used. One way this tool can be used involves the arts curriculum. This tool has a multitude of artwork that individuals have submitted. Students are able to view this artwork as well as submit their own. Another way this tool can be used is for creative and free writing. Users can choose a specific image on the website and write their own story, poem, play, etc. based on the image. You can then share your writing on the site or through social media or you can keep it private for yourself. Another way this tool can be used is for reading material. Users can read other users’ work if it is openly shared. Teachers are able to look through some of the content on the site and choose a book written about a current topic being discussed in class. For example, there are many books on the underground railroad that I wish I had discovered during my last placement as this would have been highly beneficial; the students were extremely interested in the underground railroad and I found it difficult to find appropriate content on this subject.
You can access this tool on the internet (www.storybird.com) and do not need to download anything. The stories made and read are saved on the site. On the terms of use page, it allows the information to be translated into kid-friendly language. Even so, it suggests that students under 18 still discuss and review the terms of use contract with their parents. It would be beneficial to send a letter home notifying parents that the students will be using this tool. The website explains that it does not post any inappropriate content since many schools and educators rely on this program. The website has full control over what artwork is used and which stories are shared with others. Many students now have an email address through the school that they could use to sign up since this is a requirement for writing stories; however, you can still read stories and view artwork without having an account. This tool is free to use; however, you are able to purchase copies of the work you created. This may be good for the parents if they would like to purchase their child’s writing in hard copy.
This tool could be used for any subject and for any grade; there is really no limit. As a future teacher, I would like to use this tool in my classroom to explore different ways to approach writing and explore art elements. To explore artwork, I would ask my students to view some of the artwork on the website and categorize it by different art elements: use of line, colour, contrast, etc. To approach writing, I would love to try this tool as a whole class experience where the students and I choose a picture related to a topic we are studying and the class can write something together (shared writing). Or each student can write based on that one picture and the class can explore each others’ processes of thought and perspectives with that same image (for those students who are willing to share). Students can also choose their own pictures on Storybird to use as writing prompts. This tool can also be used for group assignments; students can come up with a plot together based on a chosen picture. I would also allow the students to use this tool to add to their digital presence since they are able to share their work on social media sites as well as on Storybird.
Tuesday 3 November 2015
Mindomo
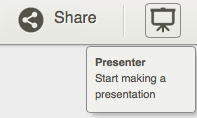
I have recently experimented with Mindomo. This software allows you to create mind and concept maps. There are many outlines that are already prepared and ready for use. However, you also have the ability to customize the map freely. Another cool option on Mindomo is the ability to make presentations from the maps that you have created. Once you create a mind map, you can click on the present button:
You are able to crop what you want on each slide of the presentation. This allows you to focus on some aspects while having the rest of the map hidden. I really liked this feature as it provides for visual learning. I also think that it is a great way to organize your thoughts. The students will be interested to see concepts laid out in a different manner.
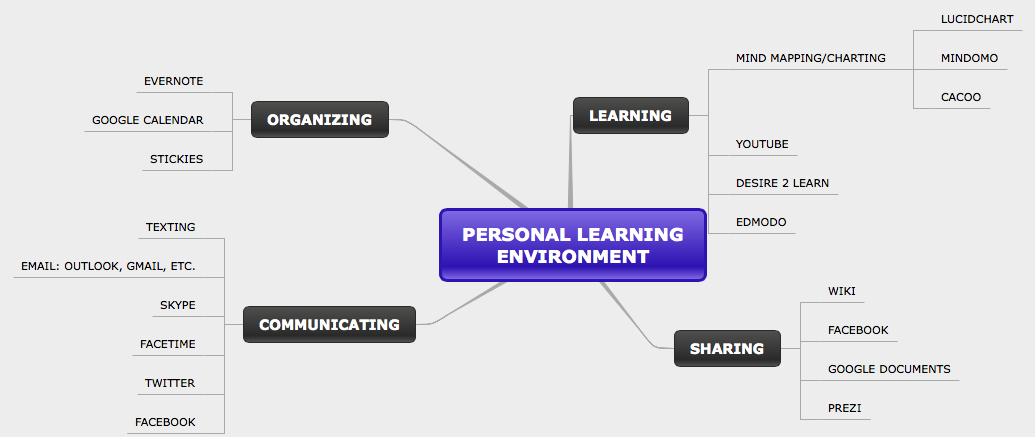
Here is an example of a concept map that I made when I was experimenting with Mindomo:
Skype
Today I will be discussing Skype & how it can be used within the education system. Skype is a program that allows people to connect & communicate through chat, video, & audio functions. It is mostly used for communication when distance between people does not allow for natural communication. Here is a video that explains some uses for Skype as well as some basic information & settings information:
Skype can be used in the education system in a multitude of ways:
- Coworkers can communicate ideas without meeting up
- Students can learn about culture by skyping with classes & people from other areas
- Guest speakers or teachers can come into the classroom through skype
- Students can Skype with students that speak a different language & try to use resources to communicate
- Skype can be used as a new technologically advanced pen pal system for each student
- MysterySkype: This is when classrooms Skype each other from around the world but are not given the other class' location. The students need to come up with questions to find out where the other class is located. I personally love this last idea & will make sure to implement it in the future
Padlet
What is Padlet & Padlet Mini? Padlet is an online bulletin board/wall that can be used in a number of ways. Those who have access (you would be able to choose who has access) are able to view and add to the content on Padlet. The best part is that it is free! This makes me especially happy :) Padlet Mini is an application that allows you to add to your Padlet much easier. It installs a button on your browser so when you find something interesting, you simply hit the button and it adds the webpage to your Padlet! Easy, huh? & very useful! These tools would be extremely useful in the classroom and education, in general. I have been experimenting with Padlet & Padlet Mini recently & have made a wall for myself to view & add to. I have made it so others are able to view my wall & ideas if they have the link (which I have included below). This wall includes links to websites as well as ideas that I have that I would like to use in future classrooms. Please click & check it out:
What are some ways to use Padlet in the classroom?
- Make a noticeboard for the students to keep them updated & on task
- Allow students to provide comments, questions, & concerns on specific lessons or concepts that are taught in class
- You can bookmark certain sites like what I have done on my experimental Padlet
- Watch & share videos on Padlet. Kids can access all of the classroom's videos on one page - Easy!
- Teachers could collaborate with one another to create lesson plans or to share ideas
Hello everyone.
Please visit my new twitter account where I will be microblogging my teaching journey! I have included a link and some of my twitter feed in the right sidebar of this blog; however, you can also reach it here: Miss Dekker's Twitter. I chose to get a twitter to stay connected with other educators as well as share and gain many classroom resources that I have used or will be using in the future. Twitter allows me to stay up to date on events and trends and provides a creative outlet for me - it allows me to creatively express myself while going about my days. I also think that twitter allows for many educational uses in the classroom:

Please visit my new twitter account where I will be microblogging my teaching journey! I have included a link and some of my twitter feed in the right sidebar of this blog; however, you can also reach it here: Miss Dekker's Twitter. I chose to get a twitter to stay connected with other educators as well as share and gain many classroom resources that I have used or will be using in the future. Twitter allows me to stay up to date on events and trends and provides a creative outlet for me - it allows me to creatively express myself while going about my days. I also think that twitter allows for many educational uses in the classroom:
- It can help remind students about homework and when it is due
- It is an opportunity to involve and invite parents into the classroom
- Show students' work and experiences in the classroom, field trips, etc.
- Twitter can be easily paired up with a class blog (like I did here)
- Twitter can connect classrooms - Teachers and students from around the world can collaborate using twitter
- Supplementary materials can be posted on twitter - Articles, news stories, opinions, etc. can be added that are relevant to class
- Facilitate discussions - Students can tweet responses to a discussion
- Update students and parents on any last minute changes in the classroom
- & so many more!
Subscribe to:
Posts (Atom)